
User Friendly SSO
Making AWS Federated Access user friendly.
Federated Access using Google Apps was a security game changer for the way we managed users. Previously we’d used AWS cross account roles, but now we didn’t need individual users in AWS accounts at all.
This made on-boarding and off-boarding team members fast, secure and easy. As soon as they had the correct SSO role setting in the Google user account, they had access into an IAM role that could then assume other roles in other accounts. When that user’s Google account was deactivated, all their access via that role was revoked.
Fast forward to present day, and the AWS SSO service offers a number of enhancements and benefits. My personal favourites are seeing the list of accounts and roles you have access to.
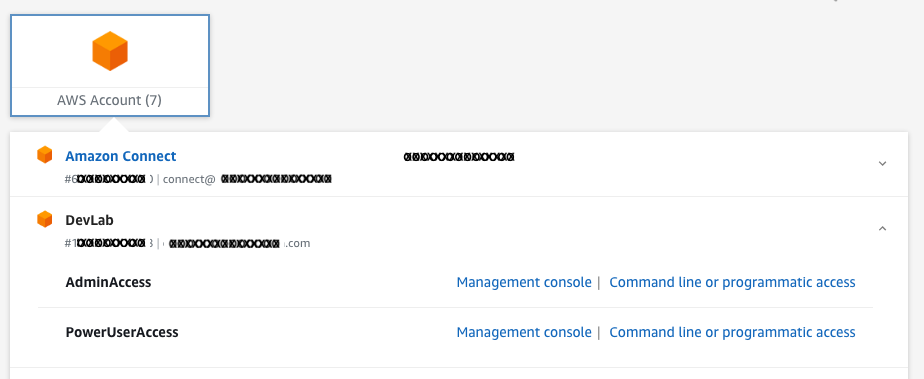
Even more useful than this are quick links to console access and CLI credentials. The latter significantly improves rapid access to the CLI on a machine you might not have completely set up with all the AWS credentials for the AWS accounts you typically access.
There’s a useful step by step guide for using G Suite as your AWS SSO service identity source.
Once this has been all set up, here’s a couple of pointers making all this a little more user friendly.
I personally like to customise the User portal URL so it’s easy to remember. You can find this setting in the AWS SSO Console Dashboard.

I’m aware that many prefer the obscurity of the default URL. With MFA in place, and the underlying security AWS SSO provides, I’m comfortable with a name somebody might guess. Memorable doesn’t mean obvious. This approach works well for me because I often jump between devices that aren’t set up with bookmarks etc. Looking up the URL is one extra step that just slows everything down.
AWS CLI access has been one area that typically requires a lot of configuration. I will often take the time to create an ~/.aws/config file that uses friendly profile names, so operating between different accounts is fast and easy.
My preference is to use the credentials file rather than AWS environment variables. To avoid having to remember the account-number_RoleName format the console offers for you to copy and paste into your credentials file, I use bash aliases like so:

[12345678_ARoleName]
aws_access_key_id=XXAXXX1XXXX1XXXXXXXX
aws_access_key_id=ASIASQJT2XJYCKIH5WMW
aws_secret_access_key=/000/aA1aAA1/AAa/aAAaaA1aaAaaaa1aAA1aa1Z
aws_session_token=AAABBBCCCDDDEEE....FFFGGGHHHIII
In ~/.aws/config create a profile for 12345678_ARoleName:
[profile 12345678_ARoleName]
output = json
region = us-east-1
Create an alias in ~/.bash_profile or ~/.bashrc with a friendly name that’s easy to remember. EG:
AWSTOOLING="--profile 12345678_ARoleName"
With this set up, when you paste the 12345678_ARoleName SSO credentials into ~/.aws/credentials you can just use your friendly name in AWS CLI commands.
EG:
aws s3 $AWSTOOLING ls
Summary
With a bit of thought and common sense it’s possible to be secure and user friendly. Some of the questions you might consider are:
- What is the over-all risk assessment using friendly names? (Are you relying solely on security via obscurity?)
- Memorable names don’t have to be obvious. If you have MFA enabled, unauthorised access is significantly mitigated.
Frequently if there isn’t a good balance between security and usability, security is going to lose out. Many hacks circumvent the meticulous devices of SysAdmins. Make a security system too difficult to use and people will find crafty ways around it. On the other hand, find ways to leveage services like AWS SSO to make user’s life’s easier, and the uptake will be immense. People won’t understand how they lived without it!